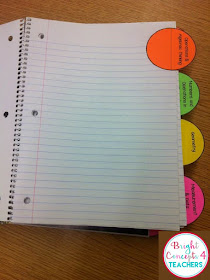
I have received several emails about HOW to set up my interactive notebooks. This is a very personal decision, but I want to share how I do it with my kiddos. When you purchase one of my interactive notebooks, there are directions of how to personalize and set up the notebooks to work for you, as well as pictures of what it can look like as a finish product.
I use 70 page wide ruled spiral notebooks for each of my interactive notebooks. The pages fit perfectly in them. This notebook also has enough pages that if a student makes a large mistake, the page can be torn out and there are plenty of extra pages to accommodate it. I also use one spiral notebook for each subject. Each of my students have 3 notebooks: one for math, one for language, and one for reading.
I have never had a problem with the pages ripping and tearing out. Also, my students keep their notebooks in their desks (more on this during the management part of this series).
Many teachers prefer composition books because they feel they are more durable. They work great too! If you choose to use composition books, you will need to print the pages at a reduced size before you make a class set to fit into the books. Usually 90-95% works just fine. However, every copy machine is different, so I suggest testing a few pages first before you make an entire class set.
Some teachers use three-ringed binders too. They hole punch the finished pages and insert them when complete. This is another choice that may work for you too.
What is most important, is that you use what works best for you and your students.
Each of my interactive notebooks also comes with strand tabs and strand covers for each of the areas the notebook covers. I like to copy the strand tabs on different colored Astrobright paper. This helps the students easily identify the strand we are working on. If we are using our math notebooks I would say, "Take out your math INB and turn to the next page in the pink tab, Measurement and Data." They know exactly were to glue the next lesson we are working on. This leaves little to no confusion.
Since I am a control freak organized person, I set up my student notebooks with the strand tabs ahead of time. This is actually a very hard thing for kindergarten through third graders to do and leaves A LOT of room for error. I tried having my own fifth grade son help me, and it was a frustrating task for him. So, I recruited my mom to help me instead. I prefer to use the front and back of the notebook pages and add several extra pages to each section for any mistakes that my occur when they are used by the students. I count the number of activities in each strand and then add about 5 extra pages.
Then, I have the STUDENTS color and glue the strand cover on top of the tab for reinforcement. Other people have laminated the tabs and stapled them into the notebooks instead of gluing them. Both work beautifully.
Finally, I glue the notebook cover (included) to the front of the notebook. I use clear packing tape to reinforce the top and bottom of the cover too. Some people like to laminate the covers and then tape them, as well.
Each of my interactive notebooks comes with tabs, strand covers, and notebook covers. However, if you want to start organizing all your interactive notebooks now, you can grab the tabs and covers ONLY, by clicking HERE!
This is a HOT topic when it comes to INB! I HATE GLUE (and paint for that matter). It is a mess no matter how much training, directions, or type of glue you use. I have learned to slightly embrace the goo. I have tried it all folks: white glue, glue sponges, glue sticks....ALL OF THEM! After all my experiences, I have settled on using GLUE STICKS! As long as they are quality glue sticks, they do the job perfectly. Yes, the kids still get glue on the desks, but at least there are not gobs of it everywhere. It comes off easily with baby wipes or Clorox wipes. All I can say is experiment and find the method that works best for you.
I hope you were able to take away a few tips and tricks from this post to help you set up your interactive notebooks. I hope you stop by next week for part three: Notebook Management.
{DON'T FORGET IT: PIN IT!}
Did you miss Part 1? No worries. Click the link below to read all about WHY you should use interactive notebooks with your students.


Hi I saw how you could purchase the covers and tabs for the math interactive notebooks but cannot find on your tpt site to be able to purchase the language arts covers and tabs though you show pics of them in your post. Do you have them to buy as well?
ReplyDeleteThanks